NetBetty: Administration
Introduction
You may have multiple configurations saved, to allow for an easy switch over should the need arise. Each configuration record is given a unique ID number which is referenced within the header file of the web site. This ensures that the web site is using the correct configuration settings.
A summary of the information stored within each configuration file is as follows:
| Site Application: | Site name and Url, browser timeout, business stream. |
|---|---|
| File Locations: | Key file locations, e.g. event files, events.cfg etc. |
| Liability Defaults: | Default settings for liability calculations. |
| Email Setup: | Site administration email addresses. |
| Display Options: | Search options, disable new registrations etc. |
| Shop Details: | Opening Times, confirmation settings etc. |
| Database Constants: | ODBC DSN Configuration. |
| GoNetBetty Email Settings: | Email addresses, email text etc. |
| Web Services: | Server Settings. |
You must log in with your personal username and password in order to make any changes to these settings. There are two levels of user which allow the web site administrator to restrict users from accessing vital site settings that would cause the site to fail.

System Setup
Using the System Setup menu, you have the following options:
Config Settings - IP settings for data source etc.
User Details - User Details
Config Settings
To access the Betty Web Administration Program configuration settings, you must first log-in to the system. Select System Setup from the menu bar, and select Config. The following screen will be displayed:
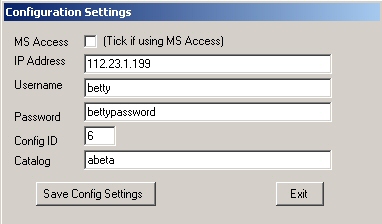
Enter the following setup information:
| IP Address: | This is the ip address of the server that is running MSDE/SQL Server where the web site information is located. |
|---|---|
| Username: | Enter the SQL Server username for the betty web account. |
| Password: | Enter the SQL Server username for the betty web account. |
| Config ID: | Enter the ID number of the current web site configuration record. (This can be found by using the Configuration Data option from the menu bar) |
| Catalog: | Enter the name of the database table that holds the configuration data. (This is usually your company name e.g. abeta) |
Once you have entered the required information, click the 'Save Config Settings' button.
Note: The MS Access option is available only to support legacy systems, which are being phased out and upgraded to Microsofts MSDE/SQL Server.
User Details
To add or modify user account details select System Setup from the menu bar, and select UserDetails. The following screen will be displayed:
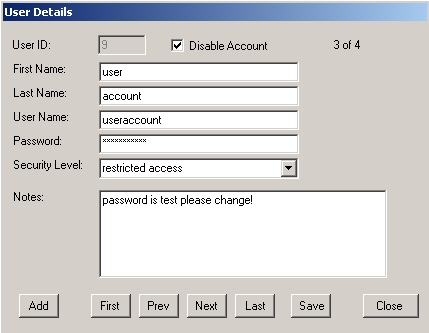
Enter the required user information and click Save.
To prevent an existing user from accessing the system, check the Disable Account box.
There are two levels of Access, Restricted and Administrator. The differences are shown below:
| Date Element | Administrator | Restricted |
|---|---|---|
| Site Application | ||
| Site Name: |  | |
| Site URL: | | |
| Browser Timer Out(mins) | | |
| Site Business Streams | | |
| File Locations | ||
| Events.cfg Location | | |
| Events Directory | | |
| DBF Directory | | |
| Decomp Directory | | |
| Copy Decomp Directory | | |
| Bank Poll Directory | | |
| ATH File Directory | | |
| ATH File Directory | | |
| IIN Table Directory | | |
| Company Sys File Directory | | |
| BWW Imports Folder | | |
| Imports Folder | | |
| Update Distributor Folder | | |
| Liability Defaults | ||
| Maximum Event Liability | | |
| Singles Threshold | | |
| Default Flow Level | | |
| Default FL_Limit | | |
| Default SP Value | | |
| Early Price Cut Off | | |
| Field Book Business Streams | | |
| Default Absolute Control Factor | | |
| Default Overspill | | |
| Update.UPD Time Check (seconds) | | |
| Check Events (Not by time) | | |
| Email Setup | ||
| Mail Server | | |
| Enable Mail Facility | | |
| Web Master Email | | |
| Admin Address | | |
| Deposit Address | | |
| Receipt Address | | |
| Bet Addendum Text | | |
| Display Options | ||
| Enable Search Icon | | |
| Suppress Search Sport Codes | | |
| Show Event Times in Grid Format | | |
| Include Sport Codes | | |
| Disable New Registrations | | |
| Hide prices when betting shop closed | | |
| Sport Codes to hide | | |
| Shop Details | ||
| Open Days | | |
| Open Time | | |
| Close Time | | |
| Confirm Bets | | |
| Send Confirmation Emails for bets | | |
| Send Confirmation Emails for deposits | | |
| Use Decimal Odds | | |
| Betting Method | | |
| Database Constants | ||
| Admin DSN | | |
| Admin Username | | |
| Admin Password | | |
| Betty DB Files DSN | | |
| Betty DB Files Username | | |
| Betty DB Files Password | | |
| GoNetBetty Email Setup | ||
| Email From Address | | |
| Email From Name | | |
| Email Subject | | |
| Email Body Text | | |
| Web Services | ||
| IP Address | | |
| Port Number | | |
System Requirements
The basic requirements of Betty Web Administration are that it is running on one of the following:
- Windows 9x
- Windows NT
- Windows 2000 or above
- Windows XP
Betty Web Administration uses the Codebase ODBC Drivers to access the BettyWeb information. These drivers are IP based and therefore, if Betty Web Administration is being installed on a machine other than a local network. The target machine must be able to communicate by TCP/IP with the machine storing the BettyWeb information.
Installation
Betty Web Administration ships with two types of installation routine.
- BWWSetup.msi (For Machines equipped with the MSI Installer)
- Setup.Exe
Note: Where possible the BWWSetup.msi installation routine should be used. If the msi installer is not available then use the setup.exe routine.
The .Net Framework can be obtained from the Microsoft Windows Update Web Site.
Once installation is complete run the application.
This completes the installation of the application.